This solution is no longer supported as Security Engineering has started using new hardware that is no longer compatible with the below firmware.
This guide is to configure and setup Security engineering’s Switchbridge for IP card reader solution to be used with Dispatcher Paragon Cloud.
Security Engineering’s Switchbridge is a dual port Ethernet interface. A USB card reader connects to the SwitchBridge™ via the USB Host port and Ethernet connection from the central network and the local printer is connected to the on board Ethernet switch. The switchbridge can send badge data to the Dispatcher Paragon Cloud server which will use the badge data information to control the dispatching of jobs to the printer.
You can read more about Switchbridge here – Switchbridge datasheet
This how-to guide has 3 parts –
-
Prerequisites
-
Switchbridge Configuration
-
Dispatcher Paragon Cloud Configuration
Prerequisites
Get MAC address printed on the back of Switchbridge. Use it to get IP address of switchbridge from DHCP server in the network. Alternatively, you can use Security Engineering’s tool sendu.exe to locate Switchbridge in network and get its MAC address.
You can download sendu.exe tool from Security Engineering site – link (On the webpage, click on IP Device Package to download tool package in zip file. When you unzip it, sendu.exe is located at path 90_ipdevicepack-4.zip/Tools
-
Switchbridge firmware version –
sbr1022app_5_02_07(Contact your solution provider to get the latest firmware.) -
Dispatcher Paragon Cloud server version – 3.0 onward is installed and licensed
-
Verify Switchbridge is plugged-in to power supply and is connected to the network and is reachable on browser at
http://<ip address of switchbridge>/index.htm -
Switchbridge is located next to printer/MFD where it will be used to release print jobs.
-
Verify suitable card reader is connected to the switchbridge on USB port and a test has been performed to ensure the reader is able to read the utilized ID cards.
Switchbridge Configuration
Use username: “admin” and password: “seceng” to login when prompted on IP card reader’s webpage
Open Switchbridge’s web page http://<ip address of switchbridge>/index.htm
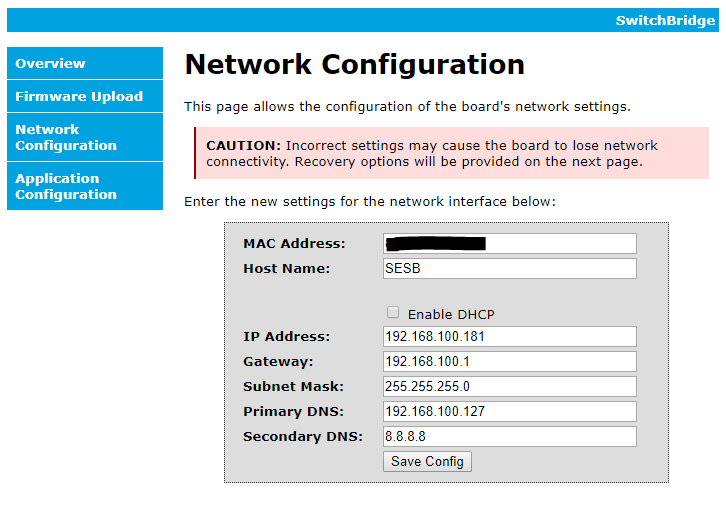
Go to Network Configuration page to add following detail –
-
MAC Address – Take note of MAC Address of Switchbridge. This will be used to configure it in Dispatcher Paragon Cloud
-
Host name – Change it to a desired name or to IP address of Switchbridge. If you are using DNS Server, make sure there is a CNAME entry for the Switchbridge on it.
-
DHCP – If you are using DHCP, select Enable DHCP option
-
DNS settings – Update values of Gateway, Subnet Mask, Primary DNS and Secondary DNS as applicable and based on your network settings
Refer to below image for sample configuration settings
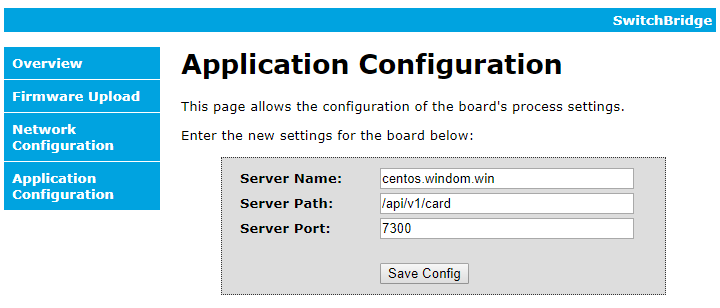
Go to Application configuration page to add following details for communication with Dispatcher Paragon Cloud –
-
Server name – Add FQDN or IP address of Dispatcher Paragon Cloud server as applicable
-
Path to be set on IP Card reader – Add Dispatcher Paragon Cloud API path
/api/v1/card/
Note: no spaces should be added before, after or in this string or the reader will not be able to communicate with the server. -
Port number – Port
7300can be used in case the communication between the controller and the server must be encrypted using HTTPs. For non-encrypted communication, port7303can be used
Refer to below image for sample configuration settings
Dispatcher Paragon Cloud Configuration
-
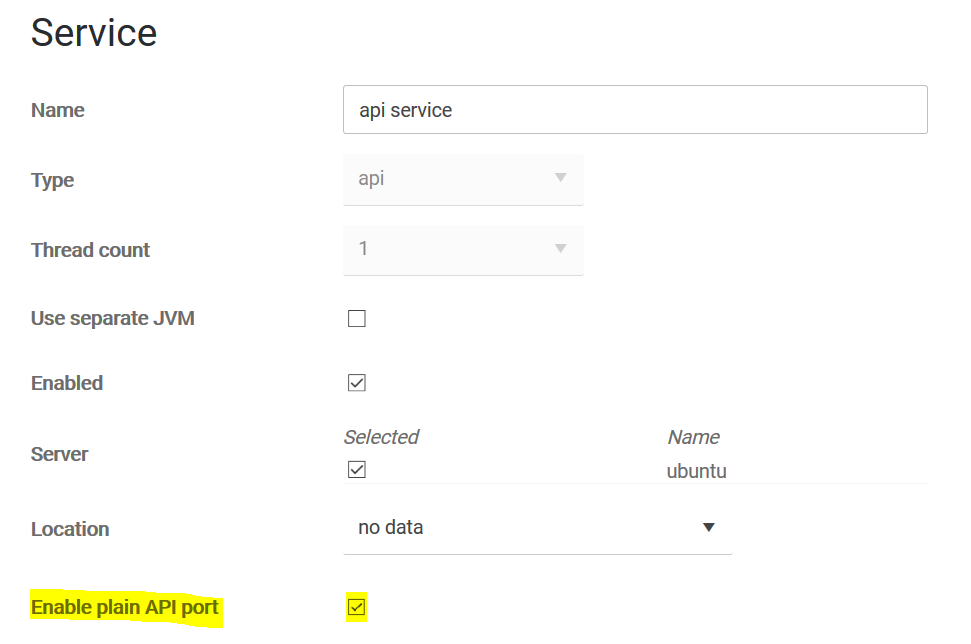
Edit Dispatcher Paragon Cloud API Service to ‘Enable plain API port’ (optional – needed only if you want to use plain port)

-
Edit Printer Settings in Dispatcher Paragon Cloud to add MAC address of Swithcbridge in IP Reader Address field on Printer where ‘swipe-and-release’ feature has to be used. Note – Please ensure all alphabets in MAC address are in upper case

-
Enroll cards on available MFD to use that card with IP card reader solution. If its not a possibility, add Card ID to the user in Dispatcher Paragon Cloud using Dispatcher Paragon Cloud public API. Link to API documentation is here. Please note that you will need to read Card ID from the Reader if not already known. One way to do so is to open notepad application on computer and plug the reader into its USB port. Card ID of the reader will be printed on the notepad.